Chocolate Pretzel Nests: with only 3 ingredients, these are so easy to make!
After a long winter, there is something so exciting about the prospect of spring. And there’s no mistaking when it’s finally here: vibrant green colors begin to peek from the ground, buds and blossoms burst from the trees, while new birds sing choruses proclaiming the arrival of warm weather and sunshine.
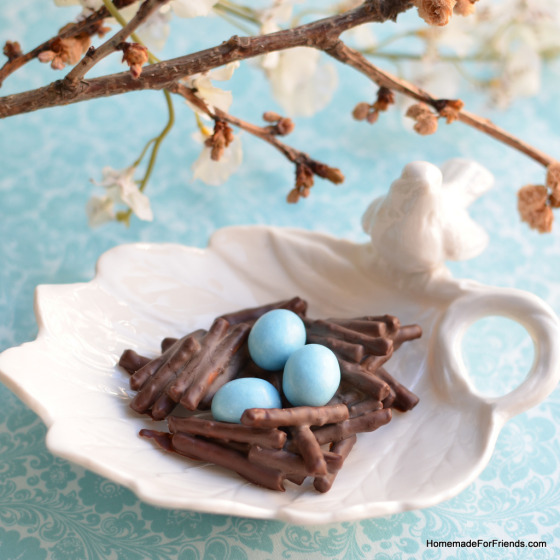
To welcome spring, there’s no better way than with a little icon of this time of year: bird nests! The cute, edible, chocolate pretzel kind of nest, that is  This recipe for homemade Chocolate Pretzel Nests is so easy - yet impressively realistic - and are perfect for holidays like Easter to party favors at a wedding or baby shower. Whether embracing the season or to honor someone special, these homemade treats are guaranteed to help celebrate a new beginning ahead!

These pretty little chocolate nests are so cute and perfect for spring!
Chocolate Pretzel Nests
Yield: 24 nests
Active Time: 20 minutes
Total Time: 1 hour
3 c. pretzel sticks, broken into 1-inch / 2.5-cm sized pieces
8 oz. / 225 g. semi-sweet chocolate, chopped into 1/4-inch / 1-cm sized pieces*
72 chocolate malt eggs
1) Line a sheet tray with parchment or wax paper and reserve.
2) In a microwave-safe bowl, melt the chocolate by microwaving in 30-second intervals, stirring in between, until most of the chocolate has melted (but a few solid pieces are still visible).
3) Stir the chocolate until the remaining pieces have melted, and, using a thermometer, verify the chocolate has reached 115 F / 46 C (if it is under, microwave in 10 second intervals until it is).
4) Add a few small pieces of solid chocolate to the mixture and stir until melted, keeping an eye on the thermometer, until the temperature cools down to 90 F / 32 C.*
5) Stir in the pretzels, ensuring each stick is evenly coated.
6) Moving quickly, place 1/4 cup-sized scoops of the mixture onto the prepared sheet tray, about a 1-inch / 2.5-cm apart .
7) Gently press 3 malt eggs into the center of each scoop.
8) Allow the nests to cool completely at room temperature until the chocolate has hardened and set (about 30-40 minutes).
9) Store in an air-tight container kept in a dark, dry place until ready to enjoy (but avoid the refrigerator as it will affect the tempered chocolate). If properly stored, these treats should stay fresh for up to a month.
* Chef’s Tip: Chocolate tempering is essential if you want to ensure the chocolate hardens properly once it’s been melted. A simple tool that will help is a chocolate thermometer (which retails for less than $10 online or in cookware stores). For an excellent tutorial on tempering, check out this great post by Sugar Hero. If tempering is not your thing, try using an alternative to chocolate, such as candy melts like these (and follow the instruction on the packaging for melting). While they will have a different flavor than chocolate, it’s a great, fail-proof way to create a similar result.

Hello spring! Nice to see you!
Gifting Idea:
For ease of portability, place a doily under each nest. If gifting as a party favor, wrap each nest in a clear cellophane bag tied with a ribbon. For a themed celebration like a baby or wedding shower, choose a color for the malt eggs that is related to the occasion (i.e. for a baby shower, use blue or pink eggs if you know the gender, and for a wedding, use the bride & groom’s wedding color). Store in a dark, dry place until ready to enjoy.
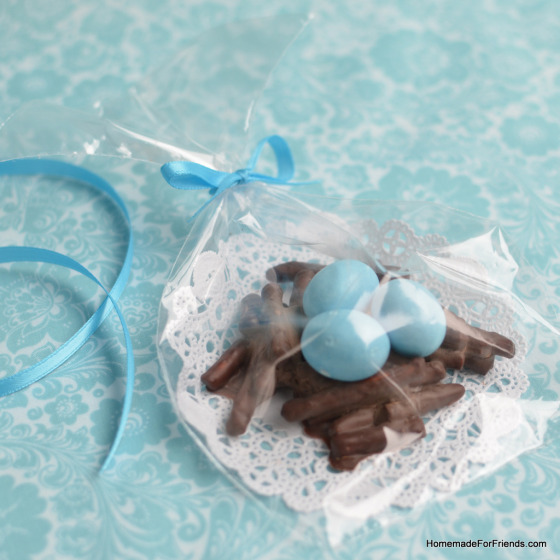
Packaged up, these Chocolate Pretzel Nests would make a great party favor for a baby or wedding shower!

Melissa, I can DEFINITELY see myself eating (and making) these nests. Malt eggs… what a lovely throwback to childhood. The salty and sweet, crunchy and creamy elements here are as appealing as your beautiful work of (food) art. I “like” this post (even though your like button is gone 😉 ). My very best, Shanna PS Happy holidays, a few weeks early.
I could definitely see this being a hit at Casa Curls and Carrots, Shanna! If you make these, please send me pictures of your little ones with chocolate covered smiles!
Check and check! I already sent the recipe to a dear friend. Her kids are adorable and fun… they would love these, too.
Adorable!!
Thanks Lia! You know, your paper feature tutorial (http://liagriffith.com/paper-feathers-simple-to-make/) could make an awesome gift tag for these too! Hm….I just might have to use these for the next baby shower I host
These are absolutely gorgeous. What a wonderful little treat. I need to forward your link to my friend…she’ll love it too!
Thank you so much! I hope your friend loves these. They are so easy to make!
Pretty!
Thanks for stopping by! So glad you like them
So cute!
Thanks! They are almost too cute to eat, but good thing it’s quite obvious they are made of delicious things. Especially the combination of salt and chocolate, mmmm….
Stop you are making me drool! Yes, they are cute but nothing with those ingredients will ever be too cute to eat. I’m fantasizing about biting into one right now!
These are so darling! I have been such a slacker in making Easter goodies this year, but these make me want to run to the store for candy eggs immediately! Thanks also for the lovely shout-out.
Thanks Elizabeth! By the way, I’m a huge fan of your book called “The Sweet Book of Candy Making” (http://www.elizabethlabau.com/books) - it’s one of my favorite go-to references at home! What an honor to have you stop by for a visit
love the salty chocolate
Mmm, so true! You really can’t beat the salty crunch from the pretzels with the sweet cocoa flavor of chocolate.